
Camping off the grid for extended periods of time has always been a major motivation for our nomadic lifestyle, long before we ever hit the road with our Airstream.
With an initial itinerary that led us to the New England coast, the Southeast, then the Gulf of Mexico, we didn’t have many opportunities for extended stays off the grid until just recently, when we finally turned our silver wagon westward for the summer. Solar quickly became a priority with all this wide-open public land to explore!

I’m just going to throw it out there: energy independence is sexy. It’s much greener, opens up lots of peaceful, beautiful camping options, and saves tons of money on campground fees. Over the last month, we’ve been living “off the grid” the majority of days we’ve been in Colorado and we’ve saved about $900 on campground fees – which more than paid for a solar panel kit!
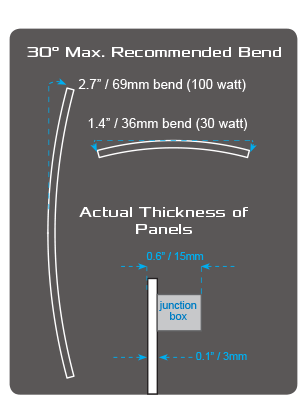
Our trailer, being only 26 feet long and 7 feet wide, has a narrow, highly curved roof (more so than new Airstreams) that has very little open real estate for solar panels amongst all the other rooftop RV necessities – an air conditioner, two fans, a skylight, and a powered HD TV antenna. We weren’t sure we could even find a solar panel that could fit our unique roof!

Flat, rigid panels are great for newer motorhomes and trailers, but just aren’t made to accommodate a curve as extreme as our roof’s. Not to mention a rigid panel would be extremely visible from the ground – not something that most aesthetically conscious vintage trailer owners would be happy about. We’d love to have flat panels that tilt to capture more of the early and late-day sun, but that just wasn’t in the cards for our 50-year-old trailer!
In a lucky Goldilocks moment, we did find one panel that fit juuuust right: the GoPower! 100 watt Solar Flex panel.![]()
GoPower! solar equipment was highly reviewed by our friends Gone with the Wynns, who are using the new flex panels on their RV. With the straightforward DIY installation, a 10 year module/5 year controller warranty, and great technical support (by native English speakers!) just a phone call away, we felt that their products were the right starting point for us to be gently introduced into the complicated world of mobile solar power without lots of time and monetary investment.
Our energy needs are pretty meager, which helps: charging our laptops and phones so we can work a few hours every day, playing some tunes through our stereo and speakers, powering our freshwater pump and electric ignitor on our water heater, running two ventilation fans on warm days, LED lights in the evenings, and sometimes our Mac Mini and LED television. We decided to start with 100 watts and add more panels later if it worked well for us.
Without further ado, our step-by-step novice experience installing a Solar Flex Kit on our Airstream (and if we get any information glaringly wrong please do chime in and correct us, dear readers – like I said, we’re complete newbies at this, but that should give you hope that you can do it too!):
Step 1: Do a happy solar dance when your kit arrives in the mail, followed by a leisurely stroll around the campground, pretending you’re just enjoying the fresh air but actually scoping out other peoples’ campsites for a ladder you might borrow.
Once you find someone with a ladder, enthusiastically promise him that you will not hold him responsible in any way if you fall off said ladder. Plan B was to buy a ladder at a hardware store and return it when we were done. We were glad plan A was a success, because we felt kind of guilty about the other plan.

Step 2: The unboxing, and this is when the real fun begins! Go ahead, immerse yourself in that new solar panel smell now, because soon you’ll be covered in caulk and sweat on a roof and you may or may not be bleeding by the end of the project. We’re not trying to scare you off installing it yourself, we’re just being realistic that projects on RV roofs that involve sealant are pretty much guaranteed to get messy, and anything we do with power tools has a strong potential for bodily harm, especially while on a trailer roof.


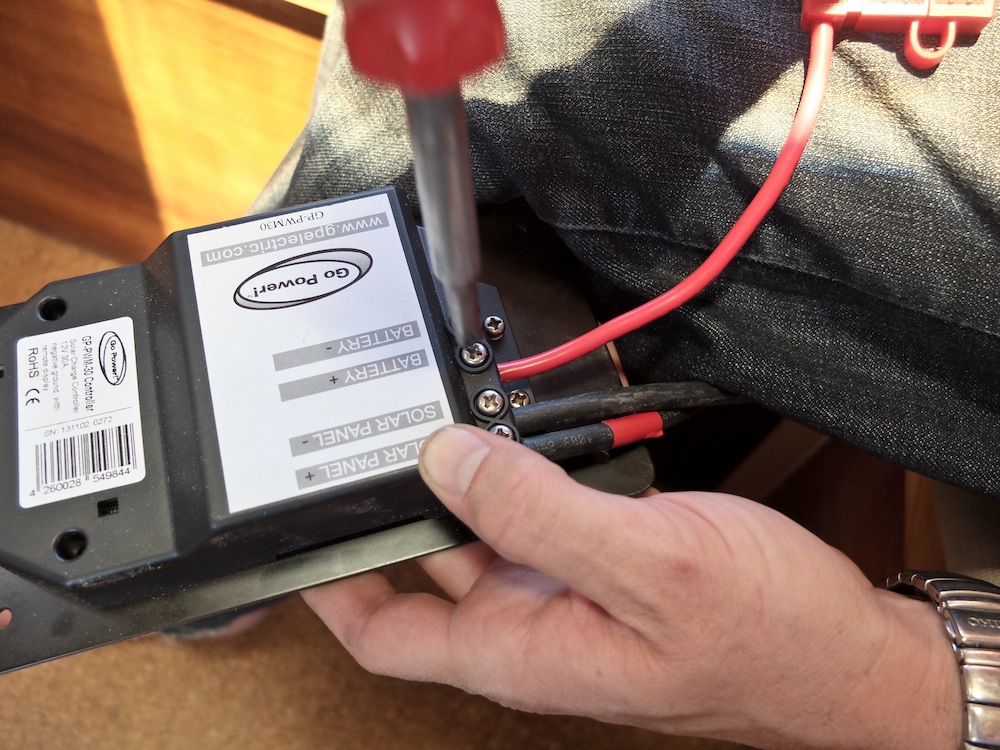
In the box was a GoPower! 100 watt Solar Flex panel, 30 Amp digital solar controller (for 80 – 480 watts of power), 50′ of #10 MC4 output cable, and mounting hardware for all of the above.
Step 3: We had already very carefully measured, and in our situation, found only one suitable installation location for our panel. If you have multiple options we’d recommend doing what Tim at The Vintage Airstream Podcast did during his installation and use the box the or a piece of paper to cut a template the size of your panel and try different configurations before installing it.

You’ll want to be especially aware of any potential shadows cast from rooftop air conditioners, vents, etc, as they will decrease the efficiency of the panel. Some of them are unavoidable, but anything you can do to lessen the amount of time the panel is in shadows is better than losing a big chunk of your panel’s efficiency. Sometimes that means parking in a way that you know the panel will get maximum exposure. When you’re wild camping, you have a lot more freedom to park facing whatever direction you’d like.
Another consideration for panel placement is how you’ll be routing the wires to your batteries. Minimizing the length of wire between your panel, the charge controller, and your batteries is best to avoid an additional drop in power, but most people will also want to do it in a way that’s aesthetically pleasing, both on the roof and indoors.
In our instance, we don’t have a rooftop refrigerator vent, which is the usual method of cable entry for most RVs. We installed a counter-height 12V fridge, so our vent is just a louvered panel at the trailer floor, which of course rules out running the thick wires all the way down the side of our trailer!
Instead, we drilled a hole in our roof – gulp! – and ran them through a waterproof cable passage in front of our skylight , into the living area, and along the wooden end cap in the front of our trailer, which is conveniently right above our batteries, housed in the front sofa. This is inconveniently where the dogs would prefer to be sleeping.

Step 4: Find a location for your charge controller that’s close to your batteries. You don’t want it to be hidden away so much that it’s hard to check the display, but the closer the controller is to the batteries the better. We haven’t yet installed a separate battery monitor, but we plan to, so we intentionally left a space for it next to the charge controller.
We picked an open spot below our couch, next to our breaker box/fuse panel/charger/converter.

Taping the template to the wood, we drilled large pilot holes at the corners then used a hand saw to “connect the dots.” This was neither the best or right way to do it, but again, we have limited access to tools!

Step 5: Install all the things! Once everything had a clearly determined mounting location and we’d measured multiple times, it was time to make things permanent. We started on the roof first with the flex panel. We were afraid of the panel ripping loose from our roof while driving if we only screwed it on, so we used a combination of adhesive/sealant (Sikaflex or Trempro 635 work well on metal) and stainless steel screws, paying special attention to sealing the front edge of the panel that faces into the wind while driving.

We only applied the adhesive around the edges of the panel, to prevent wind and water from getting underneath and to make it easier to remove if we ever had a warranty claim. A quick call to the friendly folks at GoPower confirmed that the warranty does not cover any destruction to the panel caused by removing it to mail it back for inspection, and removal damage may void the panel’s warranty. That was plenty of reasoning for not using anything that couldn’t be pried off in the future. We’ve removed this sealant before and know that it comes off with a putty knife and lots of patience, with minimal collateral damage other than our mental health.

Because our trailer’s electrical system is so unique, having been designed by us for our customized rig, and the instructions from GoPower! are pretty clear on how to attach everything, we won’t go into too much detail here. Be sure not to shock yourself connecting the wires if your panel has been exposed to the sun. It’s a good idea to throw a blanket or cardboard over the panel while you connect the wires so you don’t find out the painful way that your new panel works! We did not do this, of course, because Jason loves to play chicken with electricity and we’d already given the ladder back.
Step 6: Wait two days for it to stop raining so you’ll finally know that your new solar panel actually works. We installed ours in the New Mexico desert during a drought and it still rained for two days, starting the exact moment we finished the installation.
Step 7: Go find a quiet, beautiful place to camp off-grid and enjoy your new energy independence!
Warning: checking your solar charge level can very quickly become an addiction. If your spouse goes missing, check near your charge controller and battery monitor first. Seeing that free electricity pouring in is exhilarating!

Special considerations for fellow tin can owners:
Pick your installation time and day wisely. A polished aluminum trailer has this effect when you’re on top of it on a sunny day:

With any solar panel, heat is a major factor in the panel’s ability to produce power, and aluminum roofs get very hot. We haven’t been in extreme ambient temperatures yet, but we know that when we do, the panel’s efficiency will suffer and it might possibly even stop working if it reaches its maximum operating temperature.
Pad your ladder very well with towels where it touches your trailer. Move gingerly while on the roof, and spread your weight across the solid “ribs” of the trailer. Airstreams aren’t meant to be climbed or walked on. We used a yoga mat on the roof to keep us and our ladder from sliding off the slick metal.

An Airstream flexes. A lot. Without a straightforward recommendation from the manufacturer on how to install the panels on a metal roof, we made the decision not to caulk/use adhesive on more than just the outside edges of the panel to leave some room for flexing underneath. On hot and cold days, we hear our outer skin “pop” as it expands and contracts. We didn’t imagine this would bode well for a solar panel that had most of its surface area glued directly to the roof. We may be wrong, but we didn’t want to find out the hard way!
More RV solar resources:
Disclaimer: Our solar kit was sponsored by GoPower for the purposes of testing it on a vintage Airstream, but they did not pay us to write a positive review. Our opinions expressed here are based solely on our experiences.

A great review with excellent advice. Thanks for taking the effort to put it together. I’m sure your dry camping will be amazingly better with charged batteries.
Author
Thanks for reading our blog, Russ! We’re about as novice as you can get with RV solar installation so it’s sparse on the technical details, but there are lots of other resources out there for that information. Tim’s post at The VAP was very detailed and thorough and helped us out a good deal. It was an immensely rewarding project that improved our quality of life so much. We love the peace of mind that comes with being able to camp wherever we want, but also not worrying about our refrigerated food spoiling! 🙂
Thanks for posting this. I also have a curved installation that will use some of your tips. I however really hate how the wires on top look with all that aluminum tape just covering them. How about a custom made low profile box? Thanks again.
Author
Thanks, Phil! I know, I wish there was a better way to hide the wires. Thats another benefit of a standard solid panel – you can run the wires under the panels themselves to hide them a little. GoPower has a great new waterproof junction box for plugging multiple panels together that I wish they’d had when we did ours. It would habw really sinplified thjngs and made us less nervous about putting a hole in our roof! Best of luck with yours!
Spot on about how checking the charge control panel can become addictive! We have a new 100 Watt panel as well and I’m not only enamored watching the free energy flow in but I’m compelled to give constant, joyful updates to my spouse as well.
which adhesive did you use specifically and do you think the screws were necessary to secure the panels?
hi also about the adhesive, how many tubes did you use per panel? I’m about to install several of these and want to get prepped. thanks!
Author
Hi Dave,
We used about one tube for our single panel, including on the back as adhesive, then caulking around all the edges, over the screws, and around the junction box that went through the ceiling into the trailer. Yes, we felt the screws were necessary because we didn’t use the 3M VHB tape. We called GoPower and they advised us to attach the panel somehow that it could be removed without breaking it if we were to need to send it back for a warranty claim. They wouldn’t honor a warranty if the panel had been broken in removal. We were worried the VHB tape couldn’t be removed without damage to the panel, so we went with the screwed down edges using the predrilled holes in the panel, a light bead of adhesive around the edges of the back of the panel, and a couple beads across the middle like an “S” shape. We used the gray Trempro adhesive I believe, from Vintage Trailer Supply.
A great Airstream solar tutorial that was done differently than ours, but probably more similar to what you’ll be looking at doing since we had no roof refrigerator vent, can be seen here: 1960 Airstream Ambassador Blog. Best of luck in your install!
great review, I just landed my first Airsteam, 1982 Excella. So when I saw the Go Flex panel, I knew I wanted them. Good news is I do have a roof vent and my 31′ offers pleanty of space for additional panels. After seeing your review, I’m confident I can do this DYI myself.
I have a 160watt solar panel on an Airstream. Since I have it parked, should I push “USE” or “STORE” to prevent the batteries from discharging?
Author
Hi Ernesto!
You’ll need to check with your solar charge controller manufacturer on that one. Ours didn’t have that feature, and they’re all a little different. Happy travels!
most interesting review. Own 1997 25 ft safari airstream. Seems like replacing auto batteries happens too often. Then its power up the honda generator.
Replaced the original magna tek converter/battery charger with WFCO ultra III converter WF 9800 series. which charges much better.
Spend lots of computer time reading and reviewing about solar power. Then confusion sets in.(The sequence of shore power to converter to battery.)
Is it correct to think that solar panels amps connect to existing converter then to battery storage? Not sure where the controller panel fits into this arrangement. What happens with the AC shore power connection?
Rolo in kentucky/
the solar controller goes fused on + directly to the batteries. the converter/charger also goes fused on + directly to the batteries. This i how i am setup for almost a year of fulltiming now. this thread was a good starting point to my research since i’ve got 4 of the 100watt flex panels. you can see this setup at http://180sqft.drinkertoys.com
Author
Hey Ron! You might check out some of the diagrams that people have created here that show how an RV solar system can be configured.
While not the highest-end components out there, the Go Power kit was great for us because it included everything we needed, and instructions on how to install it. We did install it ourselves on the Airstream, and would have on the subsequent RVs we’ve had since, had they not still been inside their warranties. We didn’t have a generator on this trailer, so that was one less thing to connect, and we had designed the electrical system ourselves during the trailer’s remodel, so there weren’t any surprises.
We’ll go with someone like AM Solar for any future work – we don’t like researching and trying to install these expensive and tedious things, and would rather put it in the hands of the pros and put in a few extra hours of work at what we’re good at to pay for it. 🙂
Just curious about performance 3 years on. Have you noticed any decrease in output? How’s your mounting scheme holding up? I’ll be adding solar to my 1975 Tradewind within the next 6 months and it is very difficult to find long-term info on flex panels. Cheers,
Nate
Author
Hi Nathan! I’m afraid we don’t have our Airstream anymore and only had about a year of experience with those panels, during which time they performed great, but from what we’ve heard, the flex panels have sometimes had issues with ‘cupping’ and decreased efficiency as time goes on, depending on the manufacturer. You might check out Technomadia’s blog as they did a pretty thorough test of some in the past. You might check out some of the newer flex panel reviews by other folks, or some portable ground panels. Hope that helps – happy travels!
Dean Herold – Did you hook up the solar system to your existing batteries in your Airstream or are they separate. Also, if you hooked up to your existing batteries, was there any extra equipment you needed to protect the solar system from your batteries connected to regular electricity? Thanks